9.26.2011

Pumpkin Chocolate Chip Cookies

"Don't be a Robot."

I hear this all the time at school. Every day, we're being taught to think about ingredients, how they relate to each other, the conditions under which we are combining them. A really good example of this is what happened when I tried to pull together a pumpkin chocolate chip cookie by request. I wanted to base the recipe off of my tried and true Chewy Chocolate Chip recipe, but for reference I looked up a few variations on actual pumpkin chocolate chip recipes. What I came up with......didn't work. Like, at all.

One recipe called for two teaspoons of baking soda. That's.....a lot of baking soda. But I rolled with it because the collection of recipes I found all called for a full cup of pumpkin puree. That's a lot of pumpkin puree. So I thought, I don't know, maybe I need all that baking soda to lift all that pumpkin?

Yeah, I really didn't need all that baking soda. The cookies turned out like dense little cakes. I mean, there was a LOT of leavening happening in there.

I also used two whole eggs the first time, and combined with the full cup of pumpkin puree, I think it was just too much liquid. You all might remember that my Chewy Recipe calls for bread flour, because bread flour has a higher % of protein (gluten) than all purpose flour, it holds more moisture and it's going to give you a chewier cookie. But the higher gluten content in that flour held the moisture a little TOO well and I think that also contributed to the "dense little cakes" result.

They tasted great, but the texture was a problem.

So today I sat down with my Chewy recipe and tried to problem solve. I wanted to get out of robot mode. Given the moisture content of the pumpkin puree, what could budge in the rest of my recipe so that I could have that same pumpkin flavor?

I started by switching flours. I used all purpose instead of high gluten to see if I could crisp this cookie up a little.

I used one whole egg, and one egg yolk. Egg whites have a ton of moisture in them (I think they're something like 90% water), and I knew I didn't need the extra liquid.

I cut the pumpkin puree to half a cup, then tasted the batter to see if the pumpkin was coming through.

I took the milk out of my original Chewy recipe- I had enough moisture from the pumpkin, and didn't need more.

I cut the baking soda in half. One teaspoon turned out to be a perfect amount.

With these changes, the batter definitely felt closer to what I thought a chocolate chip cookie dough should be- so I spooned it onto the baking sheet, and into the oven it went.

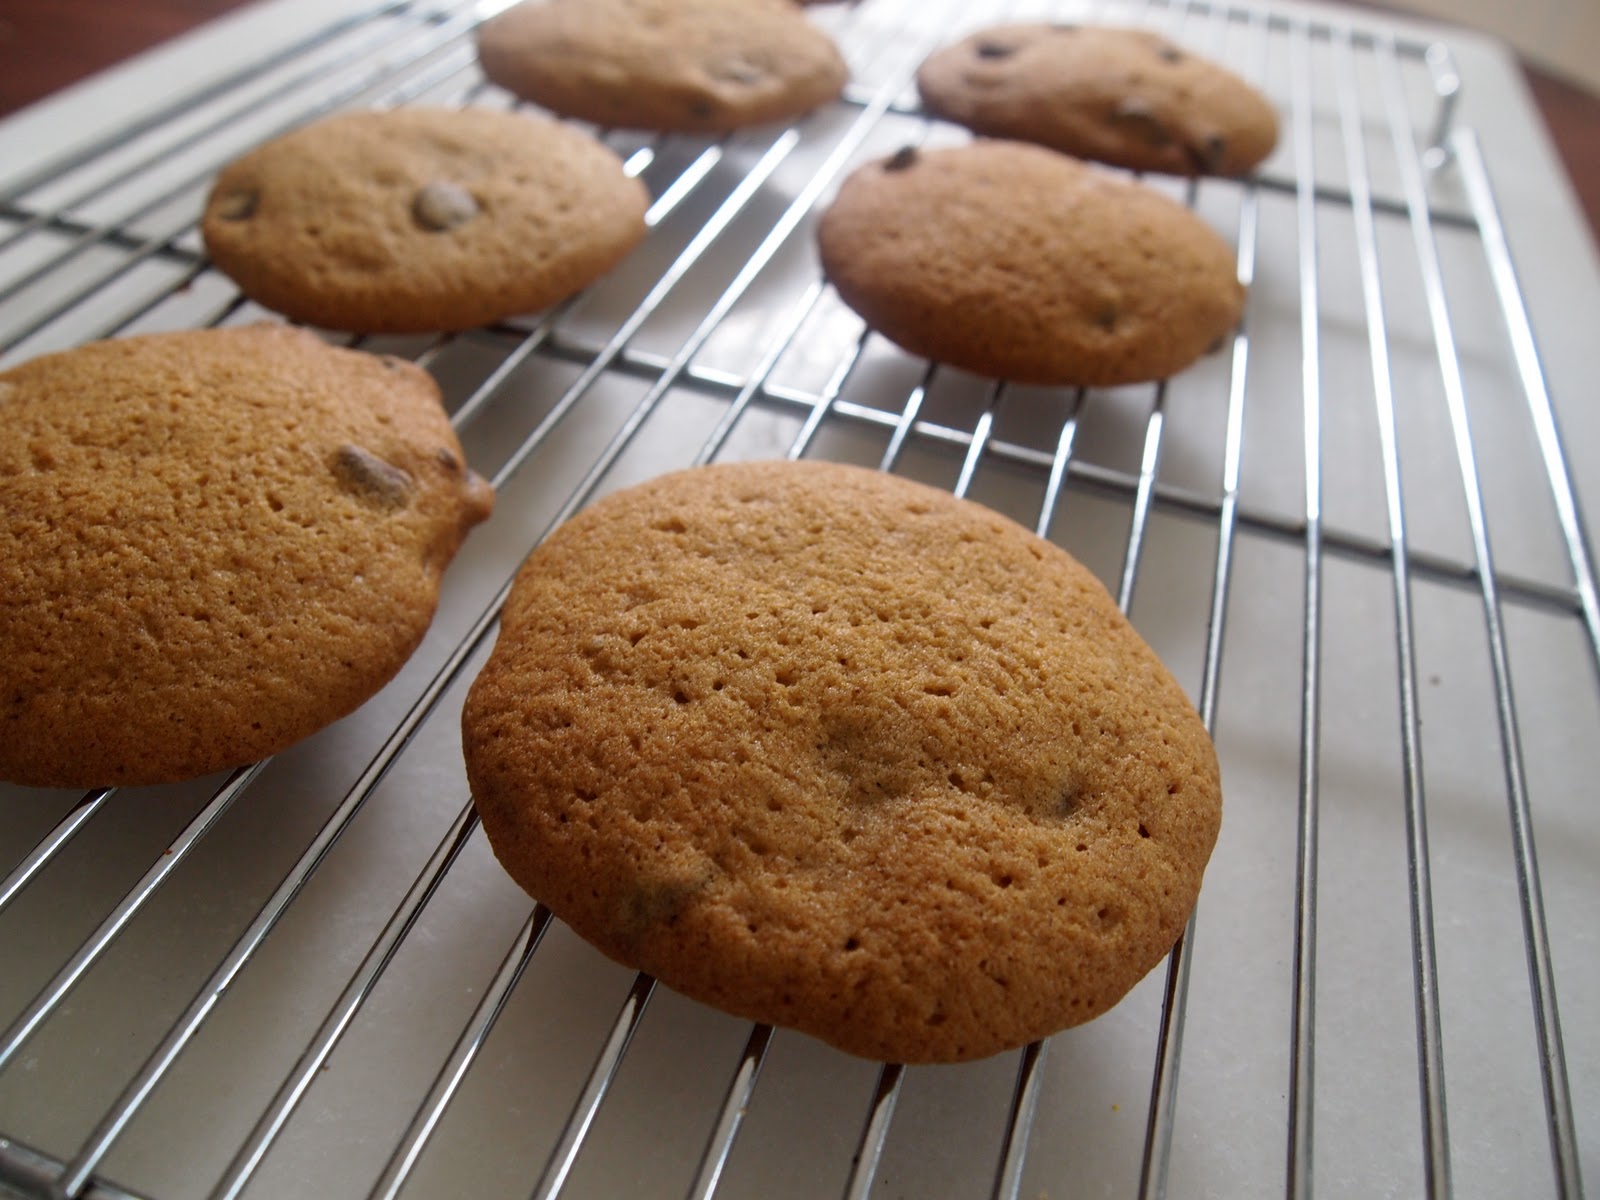
The cookies came out looking like chocolate chip cookies should. They were buttery and crisp around the edges, moist and pumpkiny inside. I'm very happy with the results, but I might keep playing with this recipe to see what happens if I cut the butter in half, and increase the pumpkin. Or what happens if I use two egg yolks and cut out the egg whites all together? I don't know, but I want to find out!

Many people think baking is straight science. That it's very precise. In some ways it is very much a science: the ratios need to be precise for a formula to work. But within those ratios you can play as much as you want. I'd love to hear what you guys do with this recipe, if you try it. Play with the spices too- I didn't use straight ginger in this recipe, but I'll bet it would be amazing....


 Pumpkin Chocolate Chip Cookies

2 sticks unsalted butter
2 1/4 cups flour (all purpose)
1 tsp kosher salt
1 tsp baking soda
1/4 cup granulated sugar
1 1/4 cups brown sugar
1 egg
1 egg yolk
1/2 cup pumpkin puree
1 1/2 tsp vanilla extract
*QS ground nutmeg
*QS ground cinnamon
*QS pumpkin pie spice
1 1/2 cups chocolate chips (semisweet, though if you prefer milk chocolate, I think they'd be good in this cookie)

Preheat oven to 375 degrees

Allow butter to soften to room temperature.

In a bowl, sift together flour, salt and baking soda, set aside.

In the bowl of a stand mixer fitted with a flat beater, combine the butter and the sugars. Beat on medium speed until the butter and sugar are light. Add the egg, egg yolk, and vanilla. Mix until well combined, scraping down the sides of the bowl if you need to.  Add the pumpkin puree, and mix until combined. Add cinnamon, nutmeg and pumpkin pie spice.

In three parts, add the dry ingredients and mix until thoroughly combined. Fold in chocolate chips.

Allow dough to chill in the fridge for about an hour.

Scoop onto parchment lined baking sheets, spacing them about 1 1/2-2 inches apart.

Bake for 12-14 minutes or until the edges turn a nice golden brown.

Remove from oven and cool on a wire rack.

Then get a nice cold glass of milk, and dive in.

*QS= quantity sufficient. flavor is subjective, so I didn't put specific quantities of spices. Add as much or as little as you like, and suit it to your tastes!

9.24.2011

Something's different...

(Hint: Pickwick Baking Co. has a logo!)

My friend, the incredibly talented and charming Wendy Bergquist (of Wendy Bergquist Design) designed a logo for my little bakery, and I think she knocked it out of the park! I'm so excited and incredibly proud to show off this design, which you will hopefully be seeing on a bakery box near you, relatively soon.

You ready?

Yes?

Are you sure? You might want to sit down for this.

Ok, you're sitting?

Good. BEHOLD:

!!!!

Pickwick Baking Co. is starting to come together. Wendy worked so hard to come up with a logo that would perfectly capture the feel of the bakery: approachable, classic, French Pastry, with a modern flair. I mean, does that cake stand not SCREAM approachable classic French Pastry? With a modern flair? I know, I agree, it really does.

Some other big happenings, uh, happening in the world of Pickwick Baking Co. is that I've dropped the "the." You may or may not have noticed, but I'm taking a page out of Mark Zuckerberg's book and now it is simply Pickwick Baking Co. (the THE is silent).

I'm also working on getting my kitchen certified for commercial use. FACT: soon the business will be up and running, and hopefully just in time for Thanksgiving pies. I will be keeping you all apprised of the progress, and YOU WILL KNOW when the kitchen is officially open for business.

Finally, speaking of Mark Zuckerberg, Pickwick Baking Co. is on Facebook! You can head on over here, and click on that old "like" button to become a FAN of the BAKERY. It's a good idea, if you like pastry and bakeries and breaking news, because that is where all Pickwick Baking Co. news and alerts will be posted (AHEM, Guinea Pigs!). Also, new blog posts. All moving off my personal facebook page, and onto the Bakery page. So go there. And like it.

(please)

9.13.2011

Biscuits

cheddar dill scones with fresh cracked black pepper

 So....THAT was a first week at school. Sorry about Pie Friday, but by the time the weekend rolled around my head was swimming with facts about quick breads, chemical leaveners, mixing techniques, yeast, proofing, kneading, baking.....WOW.

On Sunday, while I was studying, I got a picture from my friend Caitlin. She was making biscuits. I said, how funny, I'm studying the biscuit method RIGHT NOW, and she requested a post on biscuits.

So Caitlin, this is for you.

Bear with me while I offer some quick background- I'm in study mode and I just finished reading about biscuits for the third time in a row. So HERE, learn with me!

Biscuits, like muffins and loaf breads like banana bread, are a quick bread. They use a chemical leavener (baking soda or baking powder) as opposed to yeast, so they are quick to mix and quick to make. The chemical leaveners rely on chemical reactions (exposure to acid, exposure to moisture, exposure to heat), so there's no sitting around waiting for your yeast to ferment. Quick. Simple.

When you're dealing with quick breads, there are three methods for mixing. As you might imagine, the biscuit method is what you want to use when you're making biscuits, and that simply means that you're going to keep the fat (butter) in solid form, and your goal is a light, flaky dough that will be tender on the inside when baked. It's actually quite similar to mixing a pie crust dough, so if you've been following along with Pie Friday, this might look familiar.

When you're using the biscuit method to make biscuits or scones, you'll want to begin by reading through the recipe (ALWAYS- this way if you need to do something in advance like soften butter or melt chocolate, you'll be prepared)(but this doesn't apply to biscuits)(but still, read your recipe in advance). Then measure out your ingredients. Once you're all set, you can begin mixing your "formula."

Combine your liquid ingredients in a bowl (including any eggs). Sift your dry ingredients together, then cut in your fat (the butter). Add your liquid ingredients to your dry, and mix by hand until they are JUST combined. You really don't want to over mix your dough, because that will get the gluten too active and will cause your biscuits and scones to be tough, and it inhibits rise.

Once your ingredients are combined, turn dough out onto your surface and knead it lightly four or five times. Your dough should be soft- slightly elastic, but NOT sticky. If you're using a mixer for your dough, then use a slow mixing speed and keep the mixing time to a minimum. Really, you don't want to over mix.

Now you're ready for "make-up" (the cutting before you bake). On a floured surface, roll out the dough to about 1/2 inch thickness. Make sure it's evenly rolled so that your biscuits are uniform. Our Chef last week was......delighted (?) by my rustic looking bread (read: not as pretty as it could be). So honestly, you haven't failed if your biscuits aren't looking like little toy soldiers, but if you roll evenly, you should be fine. Your biscuits will double in height as they're baking.

Cut the biscuits into shapes. Scones are traditionally cut into triangles, and biscuits into circles, but no one ever said you can't have a square biscuit (right, Caitlin?), or a round scone. Here is a pro tip: if you're using a circle cutter, don't twist it as you cut, just push straight down. Twisting the cutter will inhibit rise, and your biscuits will be so sad. Don't make your biscuits sad, you guys, ok?

Place your cut biscuits on a lightly greased or parchment covered baking sheet. Here's another trick: If you want biscuits that have a higher rise and softer sides, place them close together on the baking sheet. If you want crusty sides, place them farther apart.

Bake them immediately in a hot oven.

You can brush the tops with an egg wash or buttermilk before they go into the oven, or with melted butter when they come out.

Then eat them all as fast as you can and before anyone else can get their hands on them.

No, that would be terrible! Instead, allow them to cool on a wire rack, and then serve them to your friends and family.

9.02.2011

Pear and Gorgonzola Tart

It's going to be a quick Pie Friday post today since our days are EXPLODING while four out of six of us get ready to go back to school (for some of us, that's NEXT WEEK HOLY SMOKES), but this tart is delicious. The sweet pears and caramelized onions are cut by the strong gorgonzola. Perfect for brunch, or a simple dinner with a light side salad. And how handy, pears are coming into season!

This is a Giada DeLaurentis recipe- it's essentially exactly as she's written, I've just made a few minor tweaks for preference.


Ingredients
  • 1 store bought pie shell
  • 4 ounces cream cheese
  • 2 ounces Gorgonzola
  • 1 teaspoon fresh thyme, chopped
  • Pinch salt
  • Pinch freshly ground black pepper
  • 4 tablespoons butter
  • 3 small pears, cored and sliced 
  • 1 large onion, sliced thin
  • Pate Brisee

Directions
 
Preheat the oven to 350 degrees F.

On a lightly floured surface, roll out pate brisee into a circle with a diameter slightly larger than your pie plate. Press pastry circle into the pie plate. Place in the oven, and bake until pie crust is lightly browned. Set aside to cool.

Meanwhile, combine the cream cheese, gorgonzola, thyme, salt, and pepper in a medium bowl. Using a hand blender, whip the cheeses together.

In a large, heavy skillet, melt the butter over medium heat. Add the onions and cook until they are a soft golden brown. Add pears and cook until golden on both sides, about 5 minutes.

When the tart crust has cooled slightly, gently spread the whipped cheese mixture evenly over the bottom of the tart. Place the pear slicesand caramelized onions over the cheese mixture.
 
Cut into squares or wedges and serve.


 Source: Giada Delaurentis, Pear Gorgonzola Tart Recipe